
Mmm pie. Do I start all my post about pie that way? I don’t remember.

I have mixed emotions about pies. I love, love, love to eat them, so let’s set that straight. However, I’m not necessarily a fan of making them because it’s a bit of a process for me.
Did I cut the fruit the right size? Do I have too much fruit? Do I have too little fruit? Did I roll the crust the right size to fit the pan? Is the pie done cooking? How about now? Am I taking it out too early? Did the filling thicken properly or will be pie soup? Am I over baking it? Is the crust brown enough? Oh no, is the crust too brown? Does the pie look pretty? Will it photograph well for the blog? Does it taste good?
I may or may not drive my husband crazy with these questions (heck, even I think I’m a lot to handle) and I may or may not ask each question several times. Looking at the list of questions in writing, I’m now wondering why what it tastes like is the last question I ask when it should be the first. I blame my perfectionism.

In some of my posts I pimp that it’s easy to make pie. I still stand behind that statement so don’t let this post scare you if you’re a newbie at making pies. Again, I blame my perfectionism.
Why am I sharing this long and embarrassing story with you? I want you to know that if you have the same doubts then you’re not alone. Pies are an organic structure. They have oddities due to the fruit involved, the exact way you pressed the crust into the pan, and how the ingredients mixed together before you started the whole thing. Perhaps my pictures hide some of these things, but I assure you I fret over and see every imperfection. To the point that I almost didn’t blog about the pie. (Which also drives my husband bonkers.) Maybe my story will inspire you to put your insecurities aside and just go for it. If you’re at ease when you bake things like my husband is, then… I’m jealous. 😉
I haven’t done a step-by-step tutorial in a long time, but I think it’s worth it today (for you newbies and quite frankly, as a reminder to myself).

Step 1: The raspberries and blueberries are small enough so they’re good as is. Roughly chop the strawberries. They do not have to be exactly the same size as each other or as the other berries. Also, really any ratio of these berries will work and it’s okay to play favorites. Just understand what you are getting yourself into if you favor one kind over another. Just picture what they taste like when you eat them and amplify that because you are cooking them down.

Step 2: This is the REALLY easy part. Mix the pie filling together. It looks gross but this is real life, peeps. The sugar will make it taste good and the cornstarch will help create that lovely fruit “goo.” I’m a firm believer that you do not need to pre-cook the berry filling before you bake it in the oven. Why add an extra step (and more pots to wash) if you don’t have to?

Step 3: Making the pie crust is probably the most scary part of this process, but practice makes perfect. I used to be afraid of making crust so I avoided it. My husband encouraged me to put those fears aside and now I’ve made homemade pie crust so many times that I pretty much know the recipe by heart. I even made a post specifically dedicated to the pie crust recipe where I show you step by step pictures and directions. Click here if you want to check it out. I use this handy dandy rolling mat to show me exactly how big to roll out the pie crust and it takes out virtually all of the guess work. I absolutely recommend it. There are cheaper versions out there but this one is fantastic because it’s silicone and sticks to your work space so it doesn’t move around.

Step 4: Pour the berry filling into the pie crust. Yep, hard step, I know.
Step 5: Pies are rustic looking. Period. End of story. They will not look perfect (to me) and I just have to get over that. You must see the berry filling boil and bubble and maybe even spill over the pie crust. This is part of how you will know when the pie is done cooking. If you don’t see the filling boiling and bubbling then grab a mug and a spoon because you will end up with pie soup and that’s not ideal. As my mother-in-law says “Can I pour you a glass of pie?” Let it keep oozing until the pie crust is a golden brown. If you think it’s ready, you’re probably wrong (speaking from experience). Every oven is different so just keep a close eye on it towards the end, and be patient.
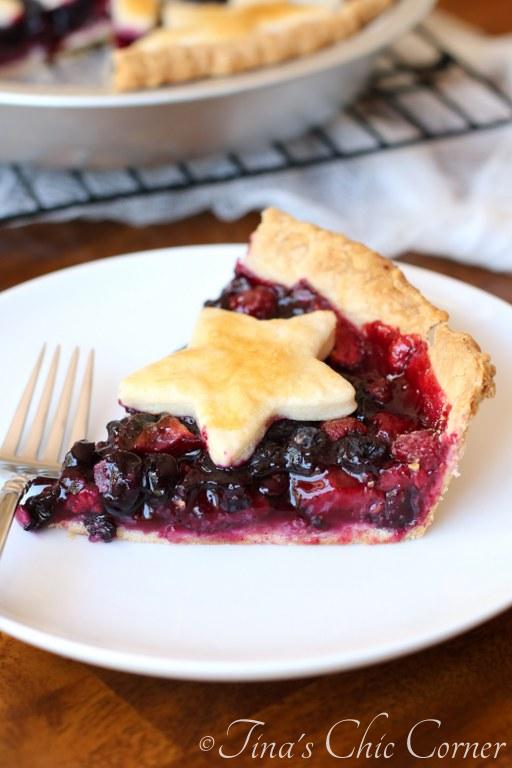
Step 6: Berry pies don’t usually have a top crust, like apple pies do. Sure, you can create a fancy lattice work for the top, but I’ll be honest, I’m not there yet. Sometimes I leave the berry pie naked on top. If I’m feeling creative then I cut out shapes to add on top. However, I bake the pie crust shapes separately because they require WAY less baking time than the pie itself. I cannot stress this enough. If you bake these toppers with the pie they will be decorative pieces of charcoal.
I’ve tried topping the pie with tin foil but the little shapes still burn. I baked them in the toaster oven and kept a close eye on them. Once the pie came out of the oven I simply transferred them onto it. Viola, crust toppers that aren’t burnt.

The fun crust shapes (stars for the 4th of July) on top of the pie are optional. Although I know my husband will say it’s not optional because more crust is more better. He’s not wrong. 🙂

Step 7: Finally and most importantly, make sure you have some vanilla ice cream handy because no berry pie is complete without it. Other flavors are not okay. Something about the pure simplicity of vanilla ice cream melting next to a warmed up slice of pie is like a ticket to heaven. 🙂

So what do you think? Are you ready to give this pie a shot? Just think, if you make it now then you’ll have the best dessert going. And if you have any leftovers it makes for a great breakfast. I know it’s not the healthiest way to start your day but it’s mostly made of fruit and that’s a good breakfast right?

Triple Berry Pie Recipe
(10 inch pie, serves 8)
Ingredients:
- 1 layer of pie crust, uncooked (See note below if you want to buy the crust.)
- 3/4 cup white sugar
- 3 tablespoons cornstarch
- 1/4 teaspoon salt
- 1/2 teaspoon ground cinnamon
- 4 cups of fresh blueberries, raspberries, and chopped strawberries (I used 2 cups of blueberries, 1 and 1/2 cups raspberries, and 1 cup strawberry pieces.)
- (Optional) For the star crust top: (See note below if you want to buy the crust.)
- 3/4 cups all-purpose flour
- 1/4 teaspoon salt
- 1/4 cup shortening, chilled
- 2 to 3 tablespoons water, very cold
- 1 egg
- 1 teaspoon water
Note: If you do not want to make the pie crust and star crust top then buy 2 pie crusts from the store. Make sure the store bought crust is big enough for the bottom layer to fit a 10 inch pan. Also, depending on the size of the store bought crust, you may not have the same number of stars as I do for this recipe (which is okay).
Directions:
- Prepare the pie crust for both the pie and the star crust top if you are doing it. If you are not doing the stars, make a single batch of crust. If you are doing the stars make 1 and 1/2 batches of the crust. (See ingredients above for the amounts to make a 1/2 batch.)
- Preheat the oven to 425 degrees F.
- Mix the sugar, cornstarch, salt, and ground cinnamon.
- Gently mix in the berries until they are all coated in the mixture.
- Line a 10 inch round baking pan with one uncooked pie crust.
- Pour the berry mixture into the crust.
- Place tin foil gently around the edge of the pie crust.
- Place the pie on the lower shelf of the preheated oven and bake it for about 50 to 55 minutes or until the berry juices have boiled for a while and look like they are thickening and the crust is a golden brown. During cooking, I rotated the pie about half way through the cooking time, and removed the tin foil from the edge while I was doing it.
- (Optional) Prepare the star crust top:
- Flour your rolling surface.
- Using a rolling pin, start rolling from the center and work your way out. Sprinkle a little flour over the top of the dough and on your rolling pin if the dough is too moist, i.e. it sticks to your rolling pin.
- Roll out the dough to a similar thickness as you did for the bottom layer of crust.
- Use a cookie cutter to cut out the stars (or any other shape you like).
- In a small bowl, whisk together the egg and water. Lightly brush the top of the pie crust (i.e. the stars) with the beaten egg mixture. There will be left overs so just make sure the top crust is well coated and don’t try to use all of it.
- Bake in a 400 degrees F oven or toaster oven for about 10 minutes. Note that every shape is different. If you are doing different shapes watch them carefully and also remember that smaller shapes may be done before larger ones and may need rescuing before the rest are done.
- When you take the pie out of the oven place the cooked pie stars on top.
- Let the pie cool for a few hours or overnight before serving.
Adapted from: All Recipes
![]()
Here are some other pretty pies.


I’m not a pie person, except for pumpkin and chocolate pies. Having said that, your pie looks delicious and the pictures you took are outstanding. I feel like I’m in your kitchen watching you. 😉
Haha so cute! Thank you so much!!